Easy Web Browsing

 Changing Easy Web Browsing Advanced Settings
 
 Contents
 
♦  Changing Style
 
♦  Setting Speech Options
 
  • Speech function
  • Speech policy
  • Magnification
   
♦  Setting Other Options
 
  • Zoom
  • Sound
  • Other Options
   
♦  Using the Settings Panel
 
♦  Using the Keyboard with the Settings Panel


 Changing Easy Web Browsing Advanced Settings
 Click the Settings button to open the setting panel and set advanced options. * You cannot change the size of the setting panel and buttons.

Style
 
"Color" button
 
♦  Changing the Style
 

Click the Style button to display 14 options.

Choose from two text sizes: normal or large.

And, choose one of the following styles:

  1. Black text on a white background with blue for links,
  2. Yellow text on a blue background with white for links,
  3. Black text on a yellow background with blue for links,
  4. Yellow text on a black background with white for links,
  5. Black text on a white background with gray scale white and black display with black for links,
  6. White text on a black background with gray scale white and black inverted display with white for links,
  7. White text on a black background with color inverted and embossed display with yellow for links.

The current setting is surrounded by a frame. Please confirm that the checkbox before the style name is marked. You can mark the checkbox by moving the mouse pointer to your choice and clicking the style name.

* You can select only one style. If you mark a different choice, your previous choice is invalidated.
 

Speech function
 
"Speech" button
 
♦  Automatically enable speech when it is available.
 
This setting determines whether speech starts automatically. This is true even when the language is other than the one that was used until speech starts (as can be the case when you move to a page in another language).
* Automatically enabling speech is the initial setting.
 
♦  Enable speech.
 
This setting determines whether you want to have speech along with magnification. If you want to use only the text magnification function, de-select the checkbox.
* Enabling speech with magnification is the initial setting.
 
♦  Display speech function status.
 
This setting determines whether the Rate and Volume buttons or the Loading Status is displayed. If you choose to display the loading status instead of the buttons, you cannot adjust the rate or the volume. However, this enables you to confirm the loading status so that you can determine how long you must wait until speech becomes possible. If you want to make an adjustment after moving to another page, de-select the checkbox on that new page to display the rate and volume buttons. If you invalidate the checkmark for "Enable speech," it is automatically checkmarked.
* The checkmark has already been invalidated at the initial startup of Easy Web Browsing.
 

Speech policy
 
"Speech Policy"
 
♦  Enable Continuous Reading Mode
 
This setting determines whether sentences, links and such on the open page are read in a consecutive manner. A displayed portion moves in conformity with a speech portion on that page. Do not move the cursor.

If you want to discontinue speech before it finishes, move the mouse to an area where no sentences or such exist on the page. If it still does not stop, right-click the mouse. When you want to restart speech, move the mouse to the point from which you want to start speech. Speech starts from the paragraph to which the mouse is moved. You cannot start speech from the middle of a paragraph.
* Continuous reading mode is disabled as the initial setting.
 

Magnification
 
Magnification
 
♦  Magnify Reading Text
 
This setting determines whether you can magnify reading text on the magnification window in the lower portion of the screen.
* Magnifying reading text in the magnification window is the initial setting.
 
♦  Text Magnification Size
 
This setting determines the number for text magnification.

Click one of the five numbers to select the respective checkbox. You can set up only one number.
* 3 is the initial setting.
 
♦  Magnification Window Height
 
This setting determines how large the magnification window can be.

Click one of the five numbers to select the respective checkbox. You can set up only one number.
Note that this setting works with the previous setting (Text Magnification Size) to determine text magnification sizes.
* 3 is the initial setting.
 

Zoom
 
"Others" button
 
♦  Apply a zoom rate during zoom slider operation
 
This setting determines whether you will see zooming happening as you move the slider or if the display will remain the same until you release the slider.
* No change in screen size until after the slider is released is the initial setting.
 
♦  Reset a zoom rate
 
This button resets the zoom rate to 100%. Press the Done button to reset the screen display size to the original one.
* You can also reset the zoom rate to 100% using the Default button - be careful, though, because all settings will be defaulted.
 

Sound
 
Sound
 
♦  Sound effects
 
This setting determines the sound pattern you hear. Choose one of three sounds or choose no sound pattern.
* Pattern 1 is the initial setting.
 
♦  Sound volume
 
This setting determines how loud sound will be. You can choose from five settings by clicking the respective checkbox. You can specify only one volume value.
* 3 is the initial setting.
 
♦  Play sound before speech on the hyperlink
 
This setting determines whether or not a sound will be played before a hyperlink is spoken.
* Playing a sound before a link is spoken is the initial setting.
 

Other Options
 
Others
 
♦  Scrollbar width
 
This setting determines the width of the scrollbar. You can choose one of three values by clicking on the respective checkbox. You can specify only one value.
* Scrollbar: A knob type portion that appears on the lower right side of the screen when the window is too small to display a whole page
* Window: An independent and small screen that is prepared at the startup of a program. An image and document are displayed on such screen.
 
♦  Pull-down menu expand lines
 
This setting determines the number of items from a pull-down menu that Easy Web Browsing displays. Choose one of three values by clicking the respective checkbox. You can specify only one value.
* Pull-down menu: A way of displaying various lists such as a list of Tokyo, Hokkaido and other prefectures that is used when addresses are input. If you click a button on the right, lists are displayed.
* 5 has already been set up at the initial startup of Easy Web Browsing.
 
♦  Create a shortcut on the Desktop
 
This setting determines whether a shortcut for Easy Web Browsing is created on the Desktop. To create a shortcut, click Do, then click Yes. The shortcut appears as an Easy Web Browsing icon on the Windows Desktop. Double-click the icon to start Easy Web Browsing.
* Desktop: A screen that is displayed when no other program has been started after the startup of Windows.
* Icon: A mark that is displayed on the Desktop. Each mark represents each program, and you can start up such program by double-clicking (clicking twice quickly) the respective icon.
 

Using the Settings Panel
 
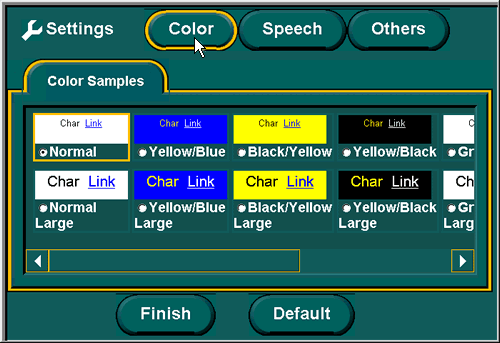
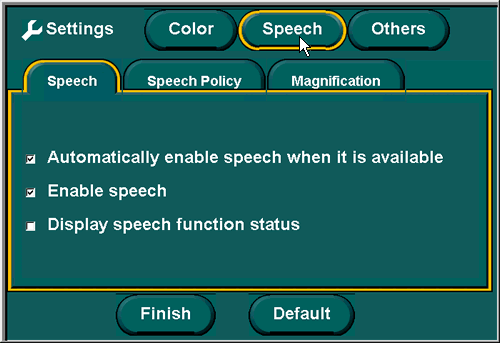
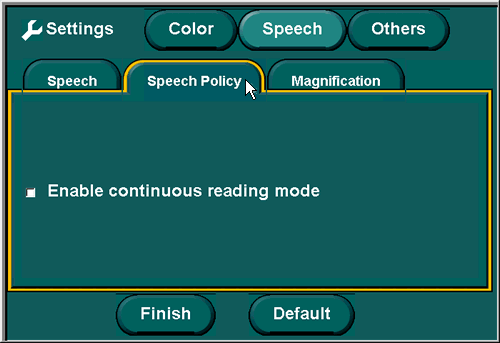
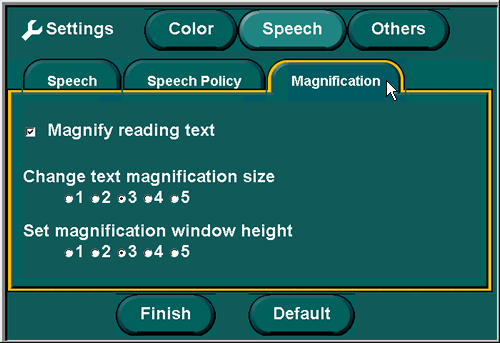
♦  Selecting an item to change
 
button
 
Click the button that represents the setting you want to change.
* Style is the initial selection.
 
♦  Exiting from the settings panel
 
"Finish" button
 
Click the Exit button to exit from the setting panel with no changes.
 
♦  Exiting from the setting
 
"Finish" button
 
Click Exit after all settings have the values you want.
The setting selected for each item is immediately reflected in Easy Web Browsing. Also, such setting is retained even after the page is moved; there is no need to save that setting.
 
♦  Resetting all the setting default values
 
"Default" button
 
To reset all the setting changes to the values initially set up for Easy Web Browsing, click the Setting button to open the Settings panel. Then, click Default.
All settings, including Rate, Volume, Out, Slider, In, and Style, are reset to default.
This operation resets settings to the default values. If you want to reset values to those of preceding conditions, but not initial settings, you must reset these individually.
 
♦  Moving the settings panel
 
To move the setting panel
 
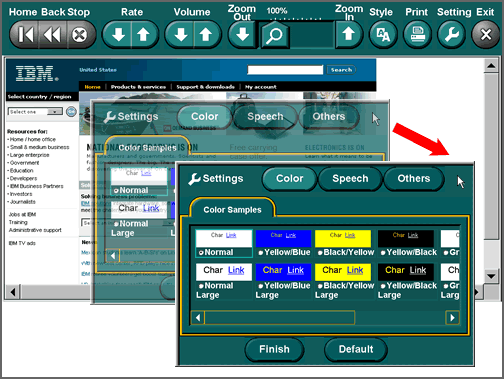
You can move the Settings panel anywhere that Easy Web Browsing is displayed. Move the panel by clicking in an area other than a button or tag on the Settings panel. You cannot change the size of the Settings panel.
 

Using the Keyboard with the Settings Panel
 
♦  Using the Keyboard with the Settings Panel
 
You can use the following keys to work with settings listed on the Settings panel. Note that you cannot use the Shift + Tab key combination to go backward to previous selections.
  1. Use the Tab key to move the selection from item to item.
  2. Use the Tab key to move between the Yes and No buttons when creating a Desktop shortcut.
  3. Use the Spacebar to select or unmark a choice represented by a checkbox.
  4. Use the Spacebar to indicate that you want to "press" the Do button while it is selected.
  5. Use the Spacebar to indicate that you want to select the Exit or Default buttons when they are selected (an orange frame surrounds the button).
  6. Use the Left or Right Arrow to select or unmark a choice represented by a radio button (circular choice).
 

© Copyright IBM Corp. 2002-2004